Showing posts with label Layouts. Show all posts

Thursday, August 22, 2013

Layout Share: Scrapbook Generations Sketch Week

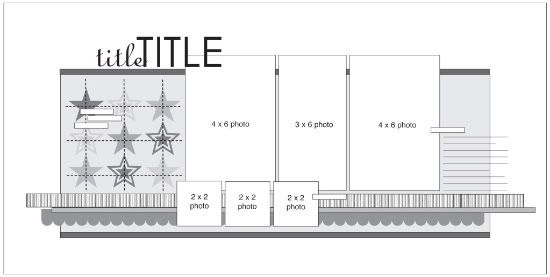
This week is Sketch week over at Scrapbook Generations.  I absolutely *LOVE* working with Allison Davis' sketches, so when she contacted the Sketch Support team to see if we would help create some layouts based on her sketches, I was totally all-in! :) 

Allison's sketches are so easy to adapt to fit your own photos/embellishments, plus she includes all the details and measurements for you on the page.  She has lots of new sketches she releases every month over at Scrapbook Generations, and here is the link to the August free sketch I used for this layout. There are lots of other sketches you can purchase as well for the month of August. Here is the link to these other great sketches.

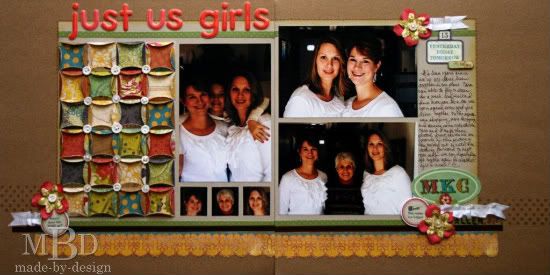
I didn't change much for this sketch, except for the photo sizes. I used a 4x6 in place of a 4x4 main photo. For the smaller photos, I used wallet size (2.5 x 3.5"). I was able to use a 6x6 paper pad for the blue background behind my photo, and used up lots of OLD paper scraps in my drawer.  Guess this layout is really a throwback since most of the supplies were older ones I've had forever. LOL
I added some stamping and washi tape to the "polaroid" frames I cut from white cardstock with my paper trimmer. I also raided my *not used often enough* Christmas stash of supplies and found these old holly leaf buttons and threaded them with crochet thread to add accents on my layout.
My journaling was done with my trusty Dymo Caption Maker. I love this thing and it's been a while since I used it, so it was high time I pulled it back out and put it to good use. Anyone else remember using these as kids? I loved to turn the wheel to make all the letters emboss. :)
For those of you who know me well, I have to use stamps on my layouts. It's a sickness, I tell you! :)  I stamped the large word "smile" in navy blue chalk ink, then added the word "blessing" below it with a green chalk ink. I love the way chalk ink stamps on kraft cardstock. I also carried the black label maker tape down on the layout by adding a few more words to the title along with the date.

Supplies Used:
The Paper Studio: Kraft Cardstock
Teresa Collins: Everyday Moments 6x6 Paper Pad
Crossed Paths: Red Pattern Paper
Chatterbox: Olive Den Plaid (and solid blue backside)
Ranger: Distress Inkpad (Walnut Stain); Foam Blender Tool
Clearsnap: Fluid Chalk Inkpads (Olive Pastel, Blue Iris)
Tsukineko: Versafine Inkpad (Onyx Black)
Stamps: Close To My Heart ("True Story"); Technique Tuesday ("Blessing"); Heidi Swapp ("Smile")
My Mind's Eye: Blue Diagonal Washi Tape
Autumn Leaves: Red Buttons
Making Memories: Holly Leaf Buttons
Dymo Caption Maker and Black Label Tape
Coats & Clark: Crochet Thread (Red and Green)
Sandpaper


Tuesday, April 24, 2012

Layout Share: I Love the Way You Love Me

It's One-page Sketch week over at Sketch Support and this was the sketch we worked with:

This is the layout I created based off this great sketch:

Variation #1: I varied the size of my photos from what was listed in the sketch. I used one 4x6” photo, and trimmed my other photos down to various sizes. Each of the photos has the date stamped on it with StazOn ink. The photos span several years of our marriage.

Variation #2: I used similar papers as shown in the sketch, but added some plain vellum over the main pattern to tone it down a bit. I also punched a scallop border on some of the papers to soften the edges.


Variation #3: I added several punched and die cut shapes for accents. The small hearts were punched, and the kissing couple was die cut with my Silhouette machine. I also stamped some sayings to include around the layout.
 
 Variation #4: I added my journaling on the title card. The title was fully die cut from my Silhouette and the words “the way” were handwritten on cardstock.


Supplies Used - Cardstock: Maple Press (Black), Georgia Pacific (White), Close To My Heart (Plain Vellum); Patterned Paper: Crate Paper (Portrait Collection: Honeymoon, Traditions, Something Blue, Vintage Lace); Inks: Marvy Uchida (Black), Ranger (Distress Inkpad: Antique Linen), Tsukineko (StazOn: Black); Stamps: Technique Tuesday (Love Ali, Simply You), Office Date Stamp; Tools: Ranger (Foam Blending Tool), EK Success (Small Heart Punch), Fiskars (Scalloped Sentiment Border Punch), WeR Memory Keepers (Corner Chomper: ¼”); Markers: EK Success (Zig Writer: Black); Embellishments: Making Memories (Silver Brads); Other: Silhouette Cameo, Die Cut Shapes: (Kara Dudley: Handwritings Love, Loni Stevens: Love 4x6 Life Card, Rivka Wilkins: Kissing Couple, Times New Roman font).

Saturday, April 14, 2012

Sketch Support Blog Hop

Today, the whole design team over at Sketch Support is participating in a "Meet the Creative Team" blog hop.  

If you are just starting at my blog, be sure to begin at the Sketch Support blog so you don't miss out on any of the fun! And you want to be sure to comment on each blog for a chance at some great giveaways!

We are all sharing layouts based off this sketch by Allison Davis:

And here's my layout I created based off this sketch:

If you have seen many of my layouts, you know that my favorite thing to do on a layout is to stamp. I wanted to do something "out of the box", so I used a couple of my son's legos and some gray ink to stamp a background.
Make sure you have a soft surface such as a mouse pad, or stamping foam under your paper to get the best impression. I had to press firmly to get the center circles to stamp from the legos.
 Here's what my stamping looked like when it was all finished. I just stamped along the bottom under the thin black strip of paper.
 Because I started with a white sheet of cardstock for my layout base, I wanted to soften it with some spray ink. I took the whole top off the spray ink and used the ink drips from the straw to get the biggest droplets. The fine drops of color were from the spray mist itself. I also edged the layout with some black ink to give it definition.
 For my title, I used my Silhouette Cameo and welded the letters together to form one large die cut title. This font is none other than Times New Roman. I did cut two colors for my title to help it pop off the page. The bottom layer is black, the top layer is white.
 For my embellishments, I used some silver sequin stars and coordinating brad colors. I love the pop of shine and texture these give to the layout.
 Supplies Used:
Close To My Heart: White Cardstock
Unknown: Gray Cardstock, Black Cardstock (Scraps used from both)
Paper Wizard: Red, Blue, Green Lego Paper
The Paper Studio: Black w/White Stitches
 Silhouette Cameo, Times New Roman Font
Ranger: Foam Blending Tool
 Ranger: Tim Holtz Distress Inkpad (Pumice Stone)
Marvy Uchida: Marvy Matchables Inkpad (Black)
October Afternoon: Sprinklers (Buttermilk)
Anna Griffin: Designer Journal Tags (Flora Collection)
7 Gypsies: Apothecary Labels (Primitive Naked)
Making Memories: Green Brads
Queen & Company: Blue Brads
Close To My Heart: Red Brads
Tree House Studio: Embossed Star Sequin, Large Star Sequin
American Crafts: Precision Pen (Black 03)

 Now, for the "getting to know me" part of the blog hop....

How long have you been scrapbooking? 
Technically, since I was little, but I started scrapping the "correct" acid free way shortly before my son was born, so almost 14 years now.

Why did you start scrapbooking? 
To be able to capture my thoughts and photos in one place. I love the artistic process of it. I'm able to combine my love of photography with my love of art and I love being able to leave notes/thoughts for my family through the years.

What is your favorite time of day to scrapbook?  
Since I've gone back to work as a dental hygienist, most of my scrapping is in the evening. But my best time to scrap is in the morning when I'm most awake...I'm not quite the late-night owl I used to be several years ago. :)

How often do you scrapbook? 
Simply put, as often as I can, but not as much as I'd like to. :)
 
Where do you scrapbook/what does your space look like? 
I have a scrapbook room that is in my laundry room (part of our garage that was closed in by previous owners). I don't have any current photos of my scrapbook room, but here's pictures of my room that I posted back in 2009. I've changed the layout of my room drastically since then, and have more base cabinets in place of the large gray desk, but you can get the general idea. :)
 
When I'm not scrapbooking you can find me...  
At work most likely, or hanging out with my family and friends. 
 
What is your favorite thing about using sketches? 
I love how easy it is to have a starting point for your layout. I do like to vary the sketches though to work for my personal style and the number of photos I'd like to use.
 
What is your favorite sketch from Sketch Support?
 
This is my favorite layout so far from Sketch Support: Two Page Layout #10  
And here's what I created with that sketch, back when I was a guest designer in March 2011.

 
For all the comments left on this blog post, I will be doing 
two random drawings. 
One person will win the One Page Vol 2 book, and another person will win the Travel Sketches book. Drawing will remain open on my blog through midnight CST on Thursday, April 19, 2012. Two randomly drawn winners will be announced here at 9:00am on Friday, April 20th.

 By commenting on all of the blogs featured in this blog hop, you can be entered to win a grand prize from Sketch Support:

Thanks for participating in our blog hop! Happy Scrapping!

Friday, January 27, 2012

Layout Share: Turning up the Texas Temps

“Turning Up the Texas Temps”


Variation #1: I changed the base shape from a star to the shape of Texas. I cut this shape with my Silhouette Cameo machine.

Variation #2: I moved the horizontal strip up to the center of my layout so it didn’t distract from the Texas shape.

Variation #3: For my photos, I collaged a grouping of five smaller photos instead of using just one 4x6 as shown on the sketch. I also just added the photos directly to the layout instead of layering them on the strips of paper. I felt they covered up my base shape too much.

Variation #4: I loved the look of the stars on the sketch, but instead of lining them up on the photos, I scattered them across my layout to balance the larger base shape. I cut the stars with my Silhouette Cameo, then stamped them with a woodgrain stamp, scored them, folded them and used a foam blending tool to add darker ink to the fold lines and edges. They are attached to the layout with foam squares. I love how these remind me of a Texas barn star.

Variation #5: Instead of adding my journaling on the right as shown on the sketch, I moved mine to the bottom left so it would balance out the largest star I used on the layout. My journaling strips were created with white cardstock that was inked directly with a cream inkpad.

Supplies Used—Cardstock: Georgia Pacific (White), DMD Inc. (Kraft), EK Success (Maple Lane: Black);  Pattern Paper: Crate Paper (Crush: Longboard), October Afternoon (Thrift Shop: Complete Set); Inks: Ranger Distress Inkpads (Walnut Stain, Antique Linen), Tsukineko (Versamark: Clear); Stamps: All Night Media (Wood grain); Stickers: Basic Grey (Pyrus: Micro Mono Stickers, Green At Heart: Chipboard Alpha), Making Memories (Tiny Alphas: Brown Ledger), Heidi Swapp (Center of Attention: Black Chipboard Alphas); Tools: Silhouette America (Silhouette Cameo: TX shape, Stars), Martha Stewart Crafts (12x12 Scoring Board), Ranger (Foam Blending Tool); Markers: EK Success (Zig Black Writer); Adhesive: Ranger (Glossy Accents), Recollections (Foam Squares).

Be sure to check out the Sketch Support Blog today for a great giveaway featuring the two newest Sketch Support books!

Monday, December 5, 2011

Layout Share: My Girl- Little Miss Independent

“My Girl: Little Miss Independent”
 
Variation #1: I only used the left side of the two page layout sketch, and I flipped the sketch so that my largest photo was on the left instead of the right. I used two 4x6” photos, two 4x4” photos and one 2x4” photo.

Variation #2: For my long title, I used two pre-printed stickers that said “My Girl” and the words “Little Miss Independent”. The stickers were mounted on a piece of turquoise cardstock. I stamped the swirl at the ends of the title for emphasis.

Variation #3: Since I only used one side of the layout sketch, I added my journaling in the blank space next to a photo. I added some sticker embellishments along with a button to help fill in the space.

Variation #4: For the accents that were included on the sketch, I substituted some of the tag stickers. The tag up near the title gave me the idea to cut the yellow flower tag sticker in half and use part of it near my journaling and the other piece above the title for my button and flower accents.

Supplies Used—Cardstock: Bazzill (Yellow), SEI (Turquoise, Pink);  Pattern Paper: SEI (Dill Blossom); Inks: Ranger Distress (Gathered Twig); Stamps: The Girls Paperie (Swirl Stamp); Stickers: Making Memories (Like It Is Diecut Stickers: Love), My Mind’s Eye (“Gertie” Girly Sticker Tags); Pens: EK Success (Zig Brown Writer); Tools: WeR Memory Keepers (Corner Chomper), Ranger (Foam Blending Tool), Martha Stewart (Cherish Border Punch); Other: Prima (Pink Flowers), Sandpaper, Cream Crochet Thread, Foam Squares.

Thursday, December 1, 2011

Layout Share: My Boy and His Furry Friend

“My Boy and his Furry Friend”


Variation #1: I substituted a photo in place of the journaling section on the layout; I just rearranged the layout to add my journaling in place of the left photo. I used two 4 x 5 ¼” photos and one 2 ½ x 4” photo.

Variation #2: Instead of using a long title, I used a pre-printed title card that said “My Boy” and I stamped the words “Furry” and “Friend”. The other words were handwritten.

Variation #3: I omitted the small journaling strips from the sketch and just added a date sticker on the lower right corner.

Variation #4: For the leaf accents that were included on the sketch, I substituted some homemade legos and stamped pawprints to go with my page theme. I created some hand stitched swirls to pull them all together. I also added some stitching along one of the thin strips below my photos. Along the other strip of paper, I added some stamped word borders.

Other tips: I sprayed the blue cardstock with some cream spray ink.

Supplies Used—Cardstock: ANW Crestwood (Deep Sea), Close To My Heart (White);  Pattern Paper: My Mind’s Eye (Life Stories: Blue Plaid, “Be Merry” Polka Dot/Cream), Memories in the Making (Window Check Navy); Inks: Ranger Distress (Gathered Twig), Ranger Distress Stain (Antique Linen), October Afternoon Color Mist (Buttermilk), Marvy Uchida (Black Marvy Matchables); Stamps: Technique Tuesday (Borderline: Family Ties), Stampabilities (Pawprint), EK Success (Antique Typewriter Alphas, “Friend” word stamp); Stickers: 7 Gypsies (Date Mini Label: Black), My Mind’s Eye (“Hattie” Boy Title), Deja Views (Family Journal Card); Pens: EK Success (Zig Black Writer); Tools: WeR Memory Keepers (Corner Chomper), Ranger (Foam Blending Tool), Making Memories (Paper Piercer); Other: Office Hole Punch, Sandpaper, Brown Crochet Thread, Foam Squares.

Wednesday, November 30, 2011

Layout Share: Wonderful, Ordinary, Everyday

“Wonderful, Ordinary, Everyday”

Variation #1: Instead of using small square photos as shown on the sketch, I used 2.5 x 3.5 wallet photos. I also varied their placement on the page and lined them up more so they were all visible. Because my photos are larger, I have less white space on the right side of my layout.

Variation #2: For my title, I stamped the words with StazOn ink in the corner of my largest 4x6 photo. I used the photo in place of the title block because it was the main focal point of my layout. I also stamped the words “never forget” and “today” above and below the photo and accented them with gemstones. I completely omitted the candles and stars as shown in the sketch.

Variation #3: Because my photos were larger than the sketch photos, the banner would not fit across the top of my page. So I created a custom banner with a variety of clocks, ribbon images and banners that were all created with white cardstock, stamps and inks. I added clear gemstones to three of the banners to add some detail.

Variation #4: Instead of adding my journaling in strips under my title, I created a custom stamped journaling tag and added a stamped word border along the top. To hide this journaling section on my page, I used an exacto knife and created a slit in the layout and made a pocket. I added some ribbon to the journaling piece so it was easy to pull out to read.

Supplies Used—Cardstock: Bazzill (Red), The Paper Studio (Grey), Close To My Heart (White);  Pattern Paper: Little Yellow Bicycle (Love Letters), Fancy Pants (Fabulous); Inks: Tsukineko (Black StazOn), Ranger Distress (Pumice Stone, Barn Door, Chipped Sapphire), Marvy Uchida (Black Marvy Matchables); Stamps: Technique Tuesday (Ordinary Days), Hampton Art (Memories Mix & Match, This Day Sentiments Mix & Match), Maya Road (Clocks), Martha Stewart (Patterns Background), Close To My Heart (Ritzy Ribbons), Glitz Designs (Love Games); Stickers: 7 Gypsies (Date Mini Label); Embellishments: The Paper Studio (Clear Gemstones), Martha Stewart (Twill Tape-Putty), Making Memories (Scrapbook Stitches-Black Thread); Tools: Tim Holtz (Tiny Attacher), WeR Memory Keepers (Sew Easy-Orange Head), Ranger (Foam Blending Tool), Exacto Knife; Pens: Close To My Heart (Outdoor Denim Marker), EK Success (Zig Black Writer).

Tuesday, November 29, 2011

Layout Share: Happy 1st Birthday

“Happy First Birthday” 
Variation #1: For my title, I layered a pre-made sticker from the Happy Days kit onto a chipboard number covered with coordinating pattern paper. The sticker was adhered with foam squares. I love how the little flag that says “happy” on it worked so well to layer over the chipboard.

Variation #2: Instead of using the large heart accents on the first page, I used a 6x8 Photo Mat Element from the Happy Day collection. I grouped a calendar also cut from the Journaling card elements paper along with one of the swirl and cake stickers for my main accents. I wrapped red string around three areas on my layout for interest.
 

Variation #3: I varied the photo placement on my layout. Instead of using small 2x2 photos, I created a photo mat and used two larger photos above and below the mat.

Variation #4: Instead of using lots of vertical layers under the smaller photos, I cut a journaling card into two sections and used it at the top and bottom of my smaller photo strip for my journaling. I also cut some thinner pattern paper strips to fill in the gaps  on the side of these photos.

Supplies Used—Cardstock: Bazzill (green, red, brown); Pattern Paper: Simple Stories (Happy Day); Ink: Ranger (Walnut Ink Distress); Adhesives: Ranger (Inkssentials Matte Accents), Scrapbook Adhesives (Foam Squares); Tools: Basic Grey (Paper Files), WeR Memory Keepers (Corner Chomper); Other: EK Success (chipboard number), Crochet Thread (Red), American Crafts (Precision Pen-Black).