Thursday, November 18, 2010

Sketch Share: The Place Where You Were Born

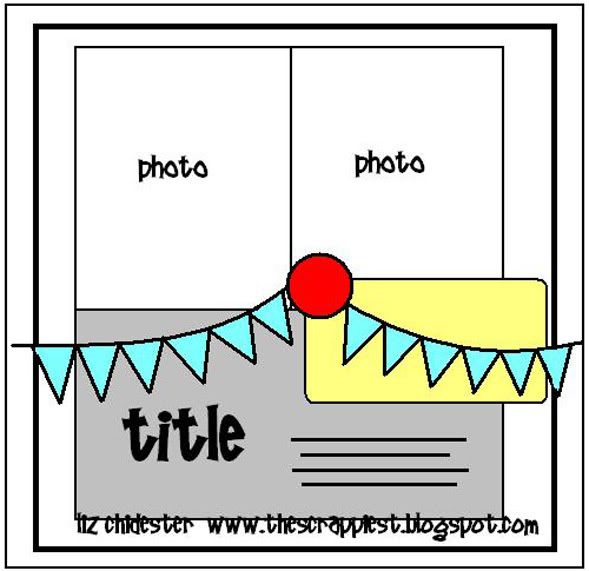
This month over at Memorable Seasons, we had another fabulous sketch by Liz Chidester.
And here's my layout based on this sketch:

I used the new Sassafras Lass paper line called Indie Girl because I loved the colors and patterns on the papers. Instead of putting my photos next to each other, I placed one on top of the other and left space in the center for my title.
I also used one of the banner stickers to create two smaller banners and added red gemstones to them. My title consists of some navy velvet alphabet stickers and some strips of white cardstock that I distressed with a light cream inkpad before writing the rest of my title by hand. The colored circle pattern started out as a plain blue printed circle and I used colored pencils to customize it for my layout so that the colors were brought into the title area.
My journaling was added on a spiral notebook page. I loved how this page had the same blues, but a subtle houndstooth pattern. To finish off the layout, I added some sponged navy ink around the edge of the page.

Supplies Used:
Sassafras Lass: Indie Girl collection
-Pocahontas and Me
-Free Spirit
-Indie Flag Banners
-Cardstock Stickers
Making Memories: Boho Chic Navy Velvet alpha stickers
Making Memories: Paperie Poolside spiral journaling page
The Paper Studio: Red gemstones
Colored Pencils: Red, green, yellow
Ranger Distress Inkpad: Antique Linen
CTMH Inkpad: Outdoor Denim
White Cardstock
Zig Black Pen
WRMK Corner Chomper
November Sketch by Liz Chidester

Tuesday, November 9, 2010

Tuesday Challenge: Create a grid on your layout

It's Tuesday and time for another weekly DT challenge over at Memorable Seasons

This week was my turn...
Sometimes I just like to create a layout with lots of photos and one of the quickest ways to do that is to create a grid on your layout base, then add your page elements in the spaces of the grid.

Here's my layout:
I created a grid with the Tim Holtz Tissue Tape, to give some structure to my layout. The grid on this page reminds me of a present, so I added a red ribbon with a button center.
 The other areas that were left on my page were the bottom for my title and the top is where I added some tags with journaling and another photo I wanted to add, but since it was a little blurry, I decided to hide it in the pocket. To create the pocket, I simply added adhesive to the sides and bottom of the photo and the tags slid in nicely behind the photo. I did stamp some borders along the tops of the tags to customize them more.

My challenge for you this week is to create a grid on your layout--you can use pen lines, ribbon, paper, etc. Just use your imagination and see what you can come up with!

Monday, November 8, 2010

Card Share: Christmas Chestnut Collection

These were the cards I created with some of my scraps from the Jillibean Soup Christmas Chestnut collection.
For the first card, I created a background on the white cardstock with a definition stamp and ink, then softened the edges with a foam sponge and the same ink color.
I hand cut the presents from the pattern paper, then added them to the card with a couple strips of patterns underneath. The green polka dot strip was punched with a scallop border. I punched the same design on the bottom of the white cardstock before adhering it to the card base. Then my sentiment was stamped in that blank area just under the kraft pattern paper.
 I added some stickles glitter to the bows on the presents and glued some stitched buttons in the centers.

Supplies Used:
*Jillibean Soup Christmas Chestnut Collection:
*-Sprig of Parsley
*-White Macaroni
*-Olive Sugar
*-White Sugar
Green and white cardstock
Hero Arts Cling Stamp: Friend Definition
Studio G Stamp: Merry Christmas to You
Ranger Distress Ink pads: Brushed Corduroy, Walnut Stain
Ranger Stickles: Diamond
Fiskars Border Punch: Scalloped Sentiment
Buttons: Brown, Red, White
White Crochet Thread
* Products received as Design Team member. All other products were purchased personally by me.
********************************

For this next card, I used one of the circle die-cuts as the main focal point.
The background was created with some 1 inch strips of three papers from this collection that were glued down to some green cardstock. I tied the green gingham ribbon around the papers, then used the sticker from the collection for my sentiment, and attached my die cut circle with foam tape. Really quick card!

Supplies Used:
*Jillibean Soup Christmas Chestnut Collection
*-White Sugar
*-Sweet Chestnuts
*-Whole Cloves
*-Journaling Sprouts
*-Cardstock Stickers
*Jillibean Soup Bean Stalks: Green/Brown (green gingham ribbon)
Brown and green cardstock
Foam Squares
*Products received as Design Team member. All other products purchased personally by me.
****************************

For this last card, I created the background with the same definition stamp on white cardstock.
 Then I layered on some of the papers--the mittens paper first, then the green and red patterns. The red pattern was punched with a scallop punch. The center circle was a plain white circle with the words "celebrate" around the circle, but I wanted it to have some scallops around it. I traced the plain circle onto the printed kraft paper background with a pencil, then used the scallop sticker border and curled the scallops around the circle. Then I glued down the white circle in the center of the scallops and added a poinsettia with a button in the center. The button was tied on with some of the brown twine from my kit.
Supplies Used:
*Jillibean Soup Christmas Chestnut Collection:
*-Turkish Bay Leaf
*-Olive Sugar
*-Red Sugar
*-Cardstock Stickers
*Jillibean Soup Journaling Sprouts: Christmas Chestnut
Hero Arts Cling Stamp: Friend Definition
Ranger Distress Ink pad: Brushed Corduroy
Making Memories: Poinsettia flower
Autumn Leaves: Red Button
*Jillibean Soup Bean Stalks: Green/Brown (brown twine)
Fiskars Border Punch: Scalloped Sentiments
CTMH: White cardstock
*Products received as Design Team member. All other products purchased personally by me.

Sunday, November 7, 2010

Layout Share: Naughty or Nice

This was the last layout I created for the Memorable Seasons design team reveal this month. Tomorrow I will be sharing the cards I created with this kit sponsored by Jillibean Soup.

This layout came together quickly with blocks of colors and patterns. I matted the two main photos onto the green paper, then bordered it with the red polka dots that I punched with a scallop punch. The other two photos were bordered with thin strips of the red polka dot and I broke up all the red color with the green gingham ribbon in the center.
The two main photos were highlighted with two of the cardstock stickers--naughty and nice. The circle stickers were matted with white punched cardstock circles. I also added some buttons to tie it all together.
For my title and journaling, I used a die cut page from a journaling notebook. I stamped the words "naughty" and "nice" onto the kraft paper strip and bordered it with the same red polka dot patterns. The December 25 sticker was matted with a white punched cardstock circle.

Supplies Used:
*Jillibean Soup Christmas Chestnut Papers:
*-Olive Sugar
*-Red Sugar
*-White Macaroni
*Jillibean Soup Christmas Chestnut Cardstock Stickers
Autumn Leaves Buttons
Fiskars Border Punch: Scalloped Sentiment
EK Success 1.5 inch circle punch
Making Memories: 5th Avenue Spiral Journal Notebook page
White Cardstock, Kraft Cardstock
Black Pen

*Products received as Design Team Member. All other products were purchased personally by me.


Saturday, November 6, 2010

Layout Share: Shiny and Bright

Today's layout is a two-pager that features the Christmas Chestnut products from Jillibean Soup.

I basically lined up my photos on white cardstock, then added strips of the red papers around the photos. The striped paper was punched with a scallop border punch. I cut out several presents from one of the papers, then placed them onto a die cut circle. I added some glitter glue to the presents to help them pop on the layout. My title was added with some pretty chipboard glitter stickers.
I also carried the green color through the layout with the holly leaves and red gems:
The die cut circles only had one that featured a present, so I cut out another gift and popped it up on top of this circle that had a printed mitten set on it. You can hardly see the mittens below unless you look from the side, but I love how I was able to use that circle and alter it to fit my layout.

 This photo shows another present that I cut out from the pattern paper, then I added red stickles glitter to the polka dots and clear glitter glue to the bow. This was also another one of the circles from the kit.
Supplies Used:
*Jillibean Christmas Chestnut Collection:
*-White Sugar
*-Sweet Chestnuts
*-Sprig of Parsley (presents cut out)
*-Journaling Sprouts
American Crafts Thickers: White Sprinkles Alphabet
Ranger Stickles: Candy Cane, Diamond
Making Memories: Holly Leaves
The Paper Studio: Red Gems, Blue Cardstock
CTMH: White cardstock
Fiskars Border Punch: Threading Water

* Products received as Design Team Member. All other products purchased personally by me.


Friday, November 5, 2010

Layout Share: Sweet Faces of Pure Joy

Wanted to share another layout I created this month using the Jillibean Soup papers.

I picked two of my favorite photos from Christmas several of years ago that showed my kids' facial expressions. I added my title with these coordinating cardstock stickers and the small red alphabet stickers from the same sheet. I used a permanent marker to add the other words in the title. The green strip of paper was accented with the printed scallop sticker. I also added some buttons and red twine for some more pops of color.
My journaling was added on the die cut circle and I used the larger letter stickers to add the date. you can also see the red poinsettias with white pearls that I added to the centers. LOVE these flowers! :)

Supplies Used:
*Jillibean Soup Christmas Chestnut Collection:
*-Heavy Cream
*-Olive Sugar
*-Journaling Sprouts
*-Cardstock Stickers
*-Glazed Green Alphabeans Letter Stickers
*Jillibean Soup Bean Stalks: Snowflakes (red twine)
Ranger Distress Ink Pad: Shabby Shutters
7 Gypsies Mini Label Stickers: Naked Color
Making Memories: Poinsettia Flowers
The Paper Studio: White Pearls
Autumn Leaves: Buttons
White Crochet Thread
Black Pen

* Products received as Design Team Member. All other products purchased personally by me.

Thursday, November 4, 2010

Layout Share: Tree Trimming

This is another layout created from the Jillibean Soup products we received in our Design Team kits this month.
I used some really old photos of my kiddos on this layout and it was fun looking back and remembering just how little they were. :)

I started by layering some of the papers along the bottom of the layout. I hand cut the scallops along the top of the kraft paper, following the paper's printed design. Once my papers were all adhered down, I added some of the coordinating trims (red and green) and added my journaling with the die cut circles that were included in our kit.
I added clusters of buttons in three places on the layout for emphasis:
Then I added my title at the top of the page with the larger green stickers in the kit. I also added a pop of color with the die cut circle behind the title. And to finish off the layout, I used my white gel pen to add stitching lines.


Supplies Used:

*Jillibean Soup Christmas Chestnut Collection
*-Red Sugar
*-White Macaroni
*-Sprig of Parsley
*Jillibean Soup Christmas Chestnut Journaling Sprouts
*Jillibean Soup Bean Stalks: Snowflakes (red twine), Green/Brown (green ric rac)
*Jillibean Soup Alphabeans: Green Glaze
Autumn Leaves Buttons: Brown, Green, Red
Black Cardstock
Ranger Inkssentials White Pen, Glossy Accents
7 Gypsies Mini Label Stickers: Naked Color
Date Stamp, Black Ink pad, Black Pen

* Products received as a Design Team Member. All other products were purchased personally by me.