Thursday, July 19, 2012

Merry Tex-Mas Snow globe card... take 2

I created this green snow globe card last year based on a card sketch by Allison Davis, and I wanted to redo the card using all Texana Designs Stamps, so I came up with this cream version and I think I like it even better!


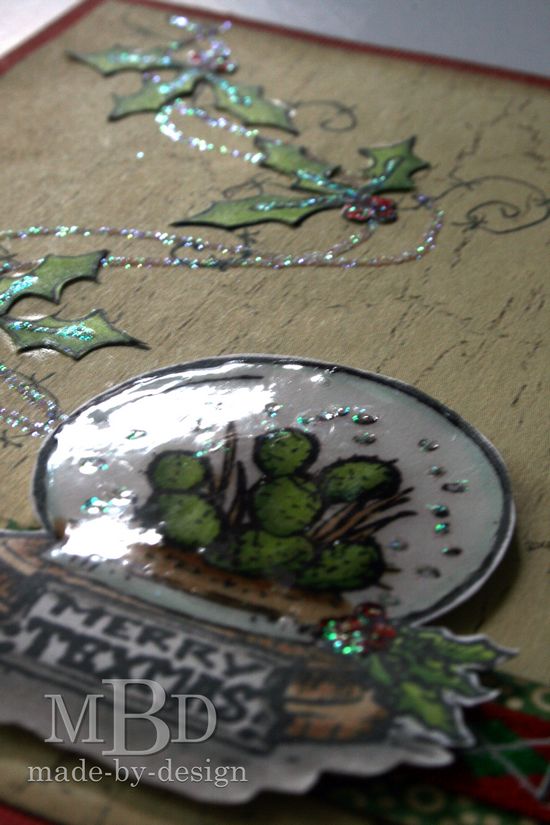
I started by stamping the holly in various directions on the cream background paper, then I added a swirl of glue pen and some prisma glitter to the background to connect the holly stamps to where the snow globe stamp will be adhered. I stamped the holly to look like a "swirl" of Texas "snow".

Once the background was prepped, I stamped the holly images on white cardstock and cut them out and glued them on top of the stamped holly leaves. Tweezers worked great on these tiny stamped images!

For the snow globe image, I stamped it on white cardstock then colored it with my copic markers. I added dots of glitter to the snow globe image, then covered the glass part of the snow globe with glossy accents. Once it was all dried, I cut it out and used foam tape to adhere it to the card.


To finish off the card, I cut a strip of green pattern paper and wrapped some ribbon around it. This whole section was attached to the card front with my Tiny Attacher staples.


Here's the finished card all by itself:


Supplies Used:
Texana Designs Stamps: 100706S Snowglobe (Small), TX046 Holly
Cardstock: Bazzil (Red), Georgia Pacific (White)
Pattern Papers: October Afternoon (Thrift Shop), K&Co (Yellow Distress Wood Flat)
Ranger Distress Inkpads: Walnut Stain
Ranger: Diamond Stickles, Glossy Accents, Foam Blender Tool
Tsukineko: Memento Inkpad (Tuxedo Black)
Copic Markers: YG03, YG63, YG67, E31, E33, E37, W1, W3, W5, BG10, C1, R24, R29, R39
Ribbon: American Crafts
Other: Prisma Glitter, Tim Holtz Tiny Attacher
Allison Davis: Card Sketch #14

Tuesday, July 17, 2012

Hummingbird and Hibiscus card

I've been so into stamping and cutting out images lately and these cards are no exception!


I began by stamping the flower and bird image stamp onto ivory cardstock with black ink and coloring them with my copic markers. I find it so relaxing to just sit and color my images. I love the vibrant colors I get with my copic markers and I love how they blend together so well. 

Once the images were colored, I cut them out and added some rock candy stickles to the flower center and some glitter to the bird and swirls. The ivory cardstock frame was die cut with my Nestabilities dies, then I inked the edges and stamped the image with 2nd generation brown ink. I glued the cut out flower and bird images to the ivory frame on top of the brown stamped image.

The base of the card was also white cardstock that I ran through my cuttlebug with an embossing folder, then I inked the embossed image with turquoise, brown and black inkpads. I trimmed around the edge of the embossed design and mounted it on black cardstock. The ivory panel with the stamped images was mounted on top of the card base with foam tape. I used both sentiment stamps for some variety.

Supplies Used:
Texana Designs Stamps: 80815 Hummingbird/Hibiscus, TD059 Caring Thoughts, TD060 Thinking of You
Tsukineko: Memento Inkpad (Tuxedo Black)
Ranger: Distress Inkpads (Brushed Corduroy, Black Soot, Tumbled Glass, Scattered Straw); Foam Blending Tool; Distress Stickles (Rock Candy)
Nestabilities: Labels 8 Die Frame
QuicKutz: Geometric Circles Embossing Folder
Sakura: Gelly Roll Clear Glitter Pen
Martha Stewart: Glue Writing Pen
Copic Markers: Y15, Y17, Y21, R22, R24, R29, R39, BG10, BG15, B02, E31, E33, E37
Wausau: Ivory Cardstock
EK Success: Maple Lane (Black Cardstock)
WRMK: Corner Chomper 
Foam Tape
 

Monday, July 16, 2012

Cactus Frame Card

This was my very first card I created for Texana Designs as a member of their design team. It has been a busy summer and I am just now getting some of my projects posted. :)

I stamped the main cactus frame onto white cardstock and colored it with my copic markers. Once it was dry, I cut around the edges and distressed the edges with brown and black inkpads and my foam ink blending tool.

To create a sentiment for my card, I used 2nd generation stamping on part of the barbed wire image from the cactus frame stamp to give a "line" for my text to follow. I stamped the word "Texas" in black ink and wrote the word "my" in front of it. Then I trimmed the white cardstock down into a banner shape, inked the edges, and mounted it with foam tape onto some ribbon loops.
The frame image was mounted on a houndstooth print, then onto kraft cardstock. Love the rustic feel to this card with the pop of bright green!

Supplies Used:
Texana Designs Stamps: Cactus Frame, “Texas” from “Texas is a State of Mind"
Handwritten word: “my”
Ranger Distress Inkpads: Antique Linen, Walnut Stain
Black Inkpad: Marvy Matchables
White Cardstock: Georgia Pacific
Kraft Cardstock: DMD Inc
Brown Houndstooth Paper: Making Memories
EK Success: Black Zig Writer
Copic Markers: YG03, YG63, YG67, Y11, Y15,Y17, R29, E33, E37, W3, W5.
Ribbon: Bazzill Basics
Foam Tape

Thursday, July 5, 2012

Card Share: Sunflower Stamp

I love to color in stamped images and this Sunflower stamp from Texana Designs was so much fun to use. I even colored it with several different color combinations. Some were using colored pencils and gamsol (odorless mineral spirits), and others were colored with Copic markers. 

I used the stamp with a grey inkpad to create a subtle background on white cardstock, then I used my distress inkpads and a foam blending tool to color the edges of the white cardstock. I love how they looked when they were all colored!

I had so much fun coloring the images, I just had to use them in as many cards as possible.  
Here are all the finished cards using the copic markers:


 And here are the cards created with the colored pencils and gamsol:


Supplies Used:
Texana Designs Stamps: WF044 Sunflower, TD043 Thank You, TD045 Happy Birthday
Ranger Distress Inkpads: Scattered Straw, Pumice Stone, Walnut Stain
Black Inkpad: Marvy Matchables
White Cardstock: Georgia Pacific
Dark Gray Cardstock: Unknown
Pattern Paper: Scraps (MAMBI, CTMH, SEI)
Copic Markers: YG03, YG63, YG67, Y11, Y15, Y17, R20, R22, W5, E33, E37, BG10
Colored Pencils: Ek Success
Gamsol
Ribbon: May Arts, Close To My Heart
Red Gemstones: Recollections
Buttons: Craft Stash
Brown, White, Black Crochet Thread: Coats Clark
Foam Tape

Tuesday, July 3, 2012

Pencil & Ink Resist Technique

I want to share a new technique I came up with last week...I was over at my friend's house with the ladies from Texana Designs Team and we had a stamping play-day. I tried to limit myself to bring just one bag of supplies for the day, so I was having to improvise a little. :)

I didn't bring many pattern paper scraps with me, and I was working on a card that begged for some patterns, so I played around with my supplies and came up with a fun new technique. I'm calling it "Pencil & Ink Resist".

To begin with, I drew some patterns on some white cardstock with a white colored pencil. I drew polka dots on one piece and a plaid design on the other. Then I took two colors of Distress inkpads and applied them directly to paper over the patterns I had drawn. The dye ink covered the paper completely except where my colored pencil lines were. I used a baby wipe to remove the excess ink from my colored pencil lines and was left with some beautiful patterns!
The next step was to stamp on the patterns. I didn't have my StazOn inkpad with me, but I used my Memento Black instead, and the pencils semi-resisted that ink also. It gave it a distressed look, but if I wanted solid black lines, I would use the StazOn next time. Overall, I love the way these patterns turned out!

I used my copic markers to color in the mason jar stamped image. The saying reminded me of sweet tea and I think it's really cool to see mason jars used as glasses, so here is my Mason Jar full of "sweet tea":
It's hard to tell in this picture, but the jar highlights have glossy accents on them to make it look more "glass-like". I also had left my baker's twine at home and was really wanting a pop of red color around the jar, so I wrapped a piece of white string around a piece of cardstock and used one of my copic markers to create red stripes. This is a great way to create customized baker's twine colors. Here's my finished card:

Supplies Used:
Texana Designs stamps: TD031 Everything is “sweet” in Texas, TX019 Mason Jar, FR008 Rectangle
Bazzill Cardstock: Tan, Red
Georgia Pacific Cardstock: White
Tsukineko: Memento Inkpad (Tuxedo Black)
Ranger: Distress Inkpads (Crushed Olive, Peacock Feathers, Fired Brick, Brushed Corduroy); Glossy Accents
Copic Markers: BG10, C1, E31, E33, E37, R29
Making Memories: White Scrapbook Stitches
Prismacolor: White Colored Pencil
Fiskars: Border Punch (Scalloped Sentiment)
Foam Tape