It's Friday again and I submitted another Frugal Friday tip for the Scrap Our Stash challenge blog. I'd love to see how you've incorporated these tips into your layouts and projects! Be sure to share them with us over on the challenge blog (email them to Kathy directly--her email is Scrappinpsycho@live.com) and your layouts might also be featured on the blog! :)
My tip today is to use your memorabilia or everyday scraps on your pages. They can be used as design elements or as accents. The memorabilia adds so much more character to the layout and helps to completely tell your story. If you are worried about your pages being acid-free, then be sure to spray your memorabilia with acid neutralizing spray. Other fun memorabilia types to use on your layouts could include plane tickets, emails, movie stubs, menus, drawings, programs, maps, receipts, clothing tags, shopping lists, stickers/labels etc. Use your imagination and see what you can find around you that helps complete the story you are telling with your pictures. The best part is that these items are usually free and have the appropriate logos or names already on them.
My tip today is to use your memorabilia or everyday scraps on your pages. They can be used as design elements or as accents. The memorabilia adds so much more character to the layout and helps to completely tell your story. If you are worried about your pages being acid-free, then be sure to spray your memorabilia with acid neutralizing spray. Other fun memorabilia types to use on your layouts could include plane tickets, emails, movie stubs, menus, drawings, programs, maps, receipts, clothing tags, shopping lists, stickers/labels etc. Use your imagination and see what you can find around you that helps complete the story you are telling with your pictures. The best part is that these items are usually free and have the appropriate logos or names already on them.
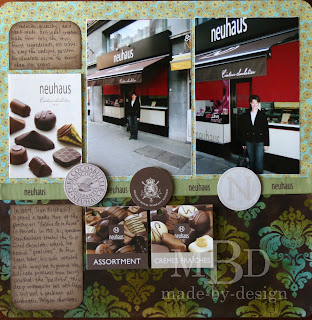
For my "Neuhaus" layout, I punched the circles from a box that the chocolates came in and added them to my layout as accents. The pamphlets that came with the chocolates showed what types of chocolates were included in the box, so I glued the pamphlet directly to the top of the layout, then popped the punched circles up with foam squares so the pamphlet would easily tuck behind the circles and stay closed in my page protector.
Here is the pamphlet at the top opened up fully...
The smaller squares under the photos were actual tags that were wrapped around some other chocolates we purchased from the same shop, and the green ribbon with the name “Neuhaus” on it was the ribbon that was wrapped around the box to keep it closed.
 Here is another layout that will go next to this Neuhaus layout in my travel album. It is a 6x12 page size and was perfect for holding the last few pictures and memorabilia I had saved from another brand of Belgium chocolates--Leonides. The brown ribbon running down the length of the layout was the one wrapped around the box and the gold foil sticker that I mounted on cardstock and attached to the layout with foam squares is the actual label that is pictured on the box that keep the box sealed closed.
The brown damask paper from this layout and from the 12 x 12 Neuhaus layout above are both left over from the Joseph's Coat technique I featured earlier on my blog in this post with directions. Be sure to click that link if you would like to know how to create this type of paper.
On my "Kinder Eggs" layout, I used the foil wrapper from the actual chocolate egg, and also the folded paper that showed the variety of toy car colors that were included inside the egg's plastic center. My egg held the yellow smart car.
I wrapped the foil around a piece of scrap card stock, then cut it down to size to fit onto my layout. I only glued the foil along the edges. Once it was folded around the card stock, the card stock gave the foil some strength so I was able to smooth it out and the the words were easy to read.
I matted the folded toy paper that came inside the egg with orange pattern paper and mounted it to the bottom of my layout. Then I was able to add my photos around those elements. You can also see that I outlined the photos and the edge of the die cut pattern paper background to give more of a finished look to the layout. This die cut pattern paper already had the blue print on the inside and the green postage stamp border around all four edges, so it was a perfect way to quickly frame my layout. The added orange colors help to keep focus on my photos and memorabilia.
I added my title with American Crafts Thickers (black felt) slightly overlapping the photo to tie everything together. I love the texture these stickers give to my layouts!
My journaling areas were added with stamped images from Purple Onion Designs (rectangular ledgers stamped in black ink onto white card stock scraps). I cut one of them apart at the top to create a smaller area for my date and added some black ribbon tied in a knot to finish it off.
In my next layout, "Our Flight", I used our plane boarding tickets for memorabilia along with some photos I took of our flight home from the plane window. I didn't worry about the tickets not being acid-free, but I did keep the tickets from touching my photos on the layout, and I created a pocket for the menus that I saved from the meals we were served while on the plane.
I used a Martha Stewart border punch (3 Dot edger) to create a border to be used on my layout. This helped to soften the lines of my layout and pull everything together with a lighter color.
I added a printed fabric sticker along the top of the layout near my title. This sticker was from the Making Memories Passport collection. My title was created with American Crafts Thickers (blue vinyl) and Making Memories glitter stickers (silver) and I staggered the letters for interest and to fill the space I had open along the top corner of the layout.
Hopefully, this gives you a better idea of some other fun ways to use memorabilia on your layouts.


