So here are the projects I created with the guest design team kit from Jill at
Memorable Seasons. She sent me some of the new
Making Memories Love Struck line and I had so much fun using it on my these cards and a layout.
So first, let's talk about these cards. The first one is the "I Love you" card.


I used the Martha Stewart Loop edger punch to create the border from black card stock. The stickers were from Pink Paislee and these are some that Jill sent me with the kit.

To create the flower, I used a white paper flower that Jill sent with the kit and covered it with a black inkpad. Then I stamped a word stamp on top with Versamark ink and embossed that image with clear embossing powder and a heat tool. The pink felt flower came in the Love Struck mixed die cut pack.
I used a black marker to add polka dots in the centers of the pink flower print on the pattern paper. I also used another backside of a paper to create the button. It is a clear button and I used Glossy Accents glue to adhere the paper to the back, then I punched the holes and added some black embroidery thread.

Next is the "Beautiful Things Felt with the Heart" card.

I hand cut several of the heart shapes from one of the pattern papers, then layered them onto the card with foam dots to create some dimension. I also added some Rock Candy Distress Stickles glitter glue to the designs on the heart and I love how this looked when it dried!

The pink border was punched from the back side of another paper using the Fiskars Apron Lace border punch. I tied a wide brown ribbon from American Crafts onto the pink card stock layer, then adhered it to my card base. At the bottom of the card, I stamped a saying from a Close To My Heart stamp set in two different ink colors.

The next card is the "Happy Valentine's Day" card.

This was a quick card to make since the main saying and the two hearts are both chipboard elements from the same coordinating mixed die cut pack. I simply used a scrap of paper from the same line and put the chipboard elements on top with foam tape. Of course, everything is better with glitter, so I added some Rock Candy Distress Stickles on the hearts and on the paper at the bottom of the card.
At the bottom of the card, I added some pattern paper and some velvet rick rack with brads on the ends. You can also see some of the clear stickles on the center of the flowers in the heart pattern.
The next card is the "Little Love Birds" card. The felt bird, the postage stamp frame, and the two pink hearts on the right were all from the mixed die cut pack. I used a solid color on the back of one of the pattern papers to punch the pink heart on the bird's tail and the pink tab that the greeting is stamped on. I also hand cut a little bird wing from the same paper. Since the papers have a white core to them, I was able to sand lightly around the edges with an emory board to give them a distressed look. The kraft colored heart on the right was punched out from a scrap I had on hand.

I tied a ribbon in a knot around the brown paper, then glued the elements down onto the bird. I used pink embroidery thread to stitch on a pink seed bead for the bird's eye and used my paper piercer to poke holes in an "x" formation to add m ore stitching details to the card. The top border is punched with the Fiskars Apron Lace border punch and then I sanded it with the emory board. The greeting was stamped onto the punched tab.
The last card is the "Be Mine" ticket card. I had so much fun using these tickets from the same die cut pack. The pink heart is also from the same pack too!
I took the tickets and lined them up on some black card stock, then accented the empty square on the right side of each ticket with some pattern paper. Here you can see the tickets before I added the squares to them. The ticket on the left had been damaged, so I designed my card to have an accent over that area and you can't even tell when the card is finished! :)

Here's the card in progress after I added the patterned squares. I did ink around the edges of the squares with a black inkpad to help them stand out a bit.
The pink postage edge border was cut from the large 12x12 die cut paper. These papers come already die cut around all four edges and I just cut off one side of the border and then cut it into smaller strips to use on each side of the tickets. I still have the three other sides intact with the die cut border around them and plan on using this paper on another layout soon. This is just one way to get more projects out of one piece of paper.

Here is a close-up shot of the finished card. I used another one of the white paper flowers Jill sent me and added Diamond stickles glitter glue to the flower for a little pop. When it had dried, I glued the flower to the pink felt heart and added a black button on top with an embroidery thread bow.
Now on to the layout....I used another one of the pattern papers from this same Love Struck line. It is the same pattern that I used on the "I Love You" card. I cut the paper down to frame my two photos, then rounded the bottom edges with my corner chomper. For the top edge, I hand cut around the printed design to give the edge a pretty scalloped border. I really like how the border turned out and it would be fun to do this again with a different pattern to see what the edge looks like when cut and finished.
The three hearts in the center of the photo mat are acetate die cuts from the coordinating pack. I layered the center heart onto some green card stock to introduce the green color for my layout. The hearts are attached to the layout with the brads so the adhesive doesn't show through the clear design. I did add some Rock Candy stickles glitter glue to the three hearts to accent each pattern printed on them.
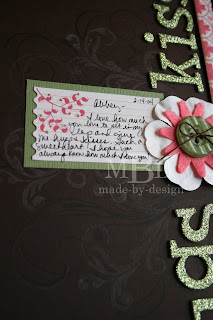
On the dark brown background of the layout, I used my favorite Autumn Leaves clear flourish stamps and stamped them on the black with Color Box Chalk Ink in Alabaster white and Clear Versamark ink (to give some of them a tone-on-tone watermark look). It is a subtle, but elegant way to ground the title for my layout, my journaling, and the accents around the title. The journaling block, the pink flower and the ticket are all from the same die cut pack. I couldn't believe how many different shapes and elements were included in the single pack. And the best part was that it was a mix of mediums...chipboard, paper, acetate and felt. So much fun to use!! I layered the journaling block on another scrap of the green cardstock and I also tied in the green color by coloring the border of the ticket green with a marker.

The title was created with some American Crafts Thickers (chipboard glitter ones) and I also used the same Pink Paislee stickers that came with the kit to tie in the pink accents. The flower in the center is a combination of layers--the white paper on the bottom, pink felt one in the middle, then a green Autumn Leaves button on top with some brown embroidery thread tied in a bow. I also added the Rock Candy Stickles glue to the pink letters and to the pattern on the journaling block.


 I used the Martha Stewart Loop edger punch to create the border from black card stock. The stickers were from Pink Paislee and these are some that Jill sent me with the kit.
 To create the flower, I used a white paper flower that Jill sent with the kit and covered it with a black inkpad. Then I stamped a word stamp on top with Versamark ink and embossed that image with clear embossing powder and a heat tool. The pink felt flower came in the Love Struck mixed die cut pack.
 Next is the "Beautiful Things Felt with the Heart" card.
 I hand cut several of the heart shapes from one of the pattern papers, then layered them onto the card with foam dots to create some dimension. I also added some Rock Candy Distress Stickles glitter glue to the designs on the heart and I love how this looked when it dried!
  The pink border was punched from the back side of another paper using the Fiskars Apron Lace border punch. I tied a wide brown ribbon from American Crafts onto the pink card stock layer, then adhered it to my card base. At the bottom of the card, I stamped a saying from a Close To My Heart stamp set in two different ink colors.
  The next card is the "Happy Valentine's Day" card.
  This was a quick card to make since the main saying and the two hearts are both chipboard elements from the same coordinating mixed die cut pack. I simply used a scrap of paper from the same line and put the chipboard elements on top with foam tape. Of course, everything is better with glitter, so I added some Rock Candy Distress Stickles on the hearts and on the paper at the bottom of the card.


 Here's the card in progress after I added the patterned squares. I did ink around the edges of the squares with a black inkpad to help them stand out a bit.


